

Webcams with built-in microphones cannot always eliminate the background noise or offer clear audio output. On the other hand, separate, dedicated microphones can easily do that. The webcams with built-in microphones can’t fulfill your high-quality audio output expectations.
The reason is the quality of that built-in microphone is average. Especially you can’t use them for professional and educational purposes. Therefore, going for a webcam with a separate mic is recommended to ensure listeners hear your voice.
Another reason to use a webcam without a built-in mic is that the manufacturers don’t have to focus on the mic and would focus on other things. Moreover, most webcams without a microphone provide better image quality and resolution. Their prices are more affordable than those webcams with built-in microphones. Besides, they provide excellent image and video quality. Let’s get familiar with when to use a webcam without a mic.
When to use a webcam without a mic?
A webcam without a mic can also offer quality that is exceptional. It offers options for complex audio projects like podcasting, live streaming classes, music recording, and presentations. Usually, an external USB microphone is a smart investment in such cases.
Webcams are designed to record videos and capture still shots for business professionals, streamers, and casual users. The inclusion of a sub-par microphone may not be effective if you demand extremely high-quality audio.
You can use a webcam with a microphone for your computer use and average communication.
Factors to consider before buying a webcam without a microphone:
1) Video resolution:
Your webcam without a microphone should have a minimum HD resolution whether you stream or record videos. 720p resolution can work in some cases. But choosing the one with at least 1080p or higher resolution is better. Those with 1080p resolution provide excellent smoothness and clarity.
2) Frame rate:
It denotes the number of images your camera can capture per second. Make sure to choose a webcam with a microphone whose frame rate is at least 30 fps; otherwise, the video recording will have a shaky effect.
3) Optical zoom:
Optical zoom capability is beneficial if you use your webcam without a microphone for gaming, webinars, or professional video calls. If you wish to obtain the best performance for conference calls, choose a webcam with at least 4x visual zoom capability. The mentioned zoom capability is essential when dealing with auditoriums and large conference halls.
4) Auto image adjustments:
A webcam without a microphone that supports auto image adjustments lets you quickly adjust images while conducting a business meeting or pursuing online learning. Certain webcams without microphones have a special lens that avoids image distortion and enhances image quality in low-light conditions. The lens decides the amount of light that reaches the camera sensor.
The top-notch quality lenses guarantee superior image quality and automatic image adjustment. To benefit from automatic image adjustments, ensure your webcam has color, white balance, and low-light correction abilities.
Best Webcams without Microphones:
| Image | Product Name | Buy |
 |
Logitech PTZ Pro 2 video camera | Check on Amazon |
 |
Lenovo 500 USB Webcam | Check on Amazon |
 |
AIRHUG 2K Webcam No Mic | Check on Amazon |
 |
Dell Ultrasharp Webcam WB7022 | Check on Dell |
 |
Razer Kiyo Pro | Check on Razer |
 |
Huddly GO Video Conferencing Camera | Check on Amazon |
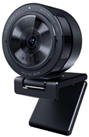
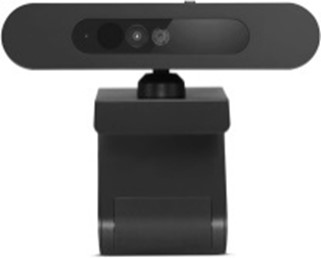
6. Huddly GO Video Conferencing Camera:
This webcam is highly recommended to anybody looking for one that can fit the entire scene in a frame from a very near distance. It can capture a wide shot and focus precisely. It is a perfect device for Zoom meetings and streaming.
Features:
- Its 150° wide-angle lens allows you to capture everybody in the room. So, it converts even the smallest rooms into superior-quality conference suites.
- The 180°Auto-flip feature allows you to install this webcam with the Huddly bracket upside down underneath your meeting room display. So, the image automatically flips to display the correct view.
- It supports lossless HD zoom up to 4x.
- It comes with a USB plug-and-play interface.
- It is compatible with both MacOS and Windows.
- It supports USB 2 and USB 3 after the update is installed.
Specifications:
| Image sensor | CMOS |
| Effective resolution | 16 MP |
| Digital zoom | 3x |
| Video resolution maximum | 1280 x 720 |
| Lens angle | 150° |
| Frame rate | 30 fps |
| Camera device supported | Computer |
| Device supported | Notebook |
| Supported applications | Zoom, Skype, BlueJeans, WebEx, and Google Hangouts |
| Dimensions and weight | 3.75 x 2.5 x 2.3 inches; 0.5 ounces |
| Included components | USB 3 Type C to C Cable (0.6 m) (helps installation in huddle spaces and small & medium-sized rooms), travel pouch |
Pros:
- Easy to handle and mount.
- Excellent image quality
- Decent zoom capability
Cons:
- It needs the effort to screw in the mount.
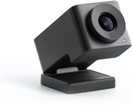
5. Razer Kiyo Pro:
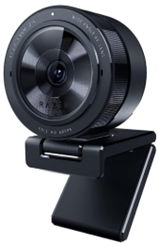
Check on Razer | Check on Newegg | Check on Amazon
You can obtain professional video standards for video conferencing and streaming with this FHD USB webcam. Its built-in high-performance adaptive light sensor provides clear, crisp image and video quality in any light condition.
You can tilt the stable webcam mount to the perfect angle after it snugly fits on your tablet or monitor. You can detach it if you want the webcam installed on a tripod setup.
It provides a 5GB/s camera signal to your stream. So, you get outstanding video performance.
The cover protects the webcam’s lens and thus ensures privacy when not used.
Features:
- Its light sensor performs better in various conditions compared to 4K webcams that depend on professional lighting devices to obtain the same result.
- With the included Type 1/2.8 ultra-sensitive CMOS sensor with STARVIS technology implemented, this webcam can determine its dark or bright surroundings. It adjusts accordingly to provide the brightness or darkness of its surroundings and changes for picture-perfect clarity every time.
- You can activate HDR at 30 fps to make your stream appear with more dynamic colors. So, it improves your video’s dynamic range and covers over and underexposed regions of the image.
- The lens is equipped with scratch-resistant and damage-resistant Corning Gorilla Glass 3.
Specifications:
| Pixel size | 2.9μm |
| Video resolution | 1080p @ 60 / 30 / 24 fps / 720p @ 60 fps / 480p @ 30 fps / 360p @ 30 fps |
| Image resolution | 2.1 MP |
| Still image resolution | 1920 x 1080p |
| Field of view | 103°, 90°, 80° |
| Focus type | Auto |
| Video encoding formats | USB 3.0: YUY2. & NV12 (uncompressed); USB 2.0 H264 codec. (compressed) |
| Sensitivity | -38 dB |
| Connection type | USB 3.0 |
| Polar patterns | Omnidirectional |
| Audio codec | 16-bit 48 kHz |
| Image quality settings customization | Supported |
| Connection type | PC with a free USB port; Windows 8 (or higher); Internet connection; 500 MB of free hard disk space |
| Compatible software | Xsplit and Open Broadcaster Software |
| Mounting options | L-shape joint and Tripod (Not included) |
| Cable length | 1.5 m braided cable |
4. Dell UltraSharp Webcam WB7022:
Check on Dell | Check on Newegg | Check on Amazon
This Dell’s 4K HDR webcam contains a huge 4K Sony STARVIS CMOS sensor. The sensor captures more light to provide superior quality, crystal-clear video, and superior image quality in its class. The digital overlap HDR provides true-to-life color in different lighting environments. The webcam makes sure you will always appear at your best
The reduction of 3D/2D video noise automatically removes grain images and motion blur, even under low light conditions. So, you would always look fantastic.
It is created for your virtually borderless displays. It magnetically attaches to the mount and fits well on your monitor; it doesn’t block any signal.
Features:
- The advanced AI auto framing retains a focus on what matters the most. Irrespective of your position, it keeps you at the center of the picture.
- You can regulate the sensitivity, the speed of camera tracking, and the tightness of the framing.
- It supports various fields of view.
- The Presets let you conveniently adjust settings according to your preference.
- The privacy shutter cap lets you easily mount the cover on the lens and ensure its protection while not in use.
Specifications:
| Connectivity technology | Wired |
| Digital video capture resolution | 4K |
| Digital zoom | 5x |
| Frame rate (max) | 30 fps |
| Key features | Advanced Digital Overlap HDR; 3D+2D Video Noise Reduction; AI Auto-Framing; Dell Express Sign-In; Auto Focus; Auto White Balance |
| Image sensor type | Sony STARVIS CMOS 8.3 MP |
| Focus adjustment | Automatic |
| Interface | Computer interface |
| Connectivity ports | USB |
| Included accessories | Lens cap, privacy cover |
| Cables included | USB-C to USB-A cable (2 m); |
| Software included | Dell Peripheral Manager for Windows OS; Dell Display Manager for Mac OS |
| Compatible OS | Win 11/10 64 bit; MacOS |
Pros:
- Excellent lens protection
- Accurate focus adjustment
- No noise or distortion in the output
Cons:
- Becomes very hot
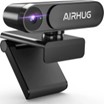
3. AIRHUG 2K Webcam No Mic:
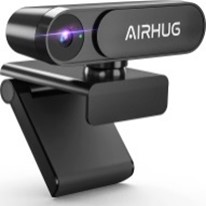 Check on Amazon | Check on Newegg
AIRHUG significantly focuses on your privacy and fully protects it. This HD webcam can effectively and easily protect your personal and family privacy. Hence, your digital online journey stays safe.
Its design shows an adjustable universal clip with a USB power cable (5 feet) that fits desktops, computers, laptops, PC, Macs, and LCD monitors. Moreover, the 360° mounting clip rotatable axis allows the webcam to capture images and videos from any angle easily. You can also opt for a webcam tripod clip to fulfill multi-angle needs. The foldable design lets you easily carry it anywhere.
Features:
- The field of view is 78° wide.
- The high-speed 1/4-inch 5 MP image sensor displays a 100% color signal for each frame. So, you get excellent color accuracy and brightness that shows the raw image quality.
- The privacy shutter cap helps you to snap the cover over the lens easily and protects it while not in use. You can record online and offline videos, even in dim light environments.
Specifications:
| Photo sensor technology | CMOS |
| Video capture resolution | 1080p, 1920p |
| Screen size | 2.7 inches |
| Special feature | Lightweight, low light |
| Other display features | Home Theater |
| Flash memory type | Micro SD |
| Dimensions and weight | 2.8 x 1.9 x 1.5 inches; 2.47 ounces |
| Included components | Privacy cover, USB cable |
Pros:
- Easy plug & play interface
- Works well in different lighting conditions.
- Affordable price
Cons:
- Privacy shutters may not work smoothly.
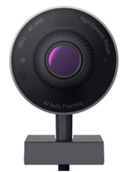
2. Lenovo 500 USB Webcam:
Check on Amazon | Check on Newegg
This USB Video Class (UVC) compliant video camera is suitable for teleconferencing applications on laptops or desktops. It can transfer video data in HD quality via a high-speed USB interface (in Full HD mode). It’s simple to operate, and the functional mechanical system provides an outstanding user experience.
Features:
- It streams or feeds its image in real-time via a computer to a computer network. Moreover, it quickly and securely performs facial recognition for Windows Hello.
- It supports Zoom and Microsoft Teams meetings.
- It comes with a manual lens cover for privacy. Slide it on if you want to cover up the camera.
Specifications:
| Video capture resolution | 1080p |
| Minimum focal length | 1 mm |
| Maximum frame rate | 30 fps |
| Digital zoom | 4x |
| Connectivity technology | USB |
| Host interface | USB 2.0 |
| Flash memory type | Micro SD |
| Camcorder type | Video Camera |
| Special feature | Low light |
| Dimensions and weight | 4.21 x 2.48 x 1.97 inches; 4.3 ounces |
Pros:
- Solid mounting mechanism
- It quickly recognizes your face and unlocks.
Cons:
- Your face must be closer to it.
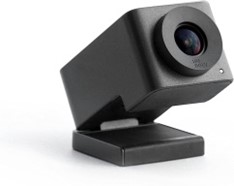
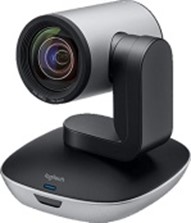
1. Logitech PTZ Pro 2 video camera:
Check on Amazon| Check on Newegg
This Logitech webcam is perfect for training environments, conference rooms, huge events, and other professional video applications. It provides premium optical and a natural video call experience. You can use it to record professional videos with sharp image resolution, excellent color reproduction, high visual accuracy, and an excellent 10X HD zoom system.
Features:
- Advanced camera technology saves bandwidth by processing video in the webcam. It leads to smooth video streaming in applications like Microsoft Skype for business.
- It records videos at 1920x1080p. So, the webcam is useful for sharing during webinars and online meetings.
- The video recording occurs at 30 fps.
- The zoom capability is up to 10X.
- Its remote control has a range of up to 8.5 m.
- The wide field of view displays everyone.
- The improved pan/tilt and zoom motor performance smoothen the movement from preset to preset.
Specifications:
| Photo sensor technology | CCD |
| Optical zoom | 10x |
| Screen size | 2 inches |
| Special feature | Low light |
| Flash memory type | Micro SD |
| Included components | power adapter, quick start guide, USB cable |
| Dimensions and weight | 3 x 6 x 12 inches; 1.28 pounds |
Pros:
- Automatic adjustable lighting
- High picture clarity
- No buffering
Cons:
- Blueshift when used over 5 feet.
Elgato Facecam Full HD Webcam:
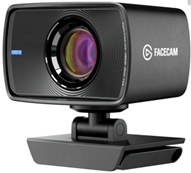
The Facecam Pro can produce a high res 4K image and output a 4K stream @ 60 fps. The Elgato Face Cam Pro is the first and only webcam that supports 4K/60fps streaming. You can use it for video calls, live streaming, and gaming.
Features:
- The f/2.4 24 mm all-glass Elgato Prime lens offers studio-quality optics.
- The focus range is 30 – 120 cm.
- The advanced image engine offers uncompressed videos free from artifacts. So, it processes maximum data at high speed.
- The video resolution is 1080p, and the frame rate is 60 fps.
- The USB 3.0 interface transfers image with minimum latency.
- The field of view is 82° offering a wide angle and full frame view.
- A fixed focus range keeps the subject in focus.
- Autofocus works for up to four inches far from the lens.
Specifications:
| Form factor | DSLR |
| Photo sensor technology | CMOS |
| Sensor type | Sony STARVIS CMOS |
| Lens type | Prime |
| Optical sensor resolution | 2 MP |
| Optical zoom | 3 x |
| Min focal length | 24 mm |
| Minimum diaphragm opening | 22 f |
| Connector type | USB |
| Screen size | 2.3 Inches |
| Flash memory type | SD |
| Special feature | Low Light |
| Batteries required | No |
| Connector type | USB |
| Device interface | Primary buttons |
| System requirements | Windows 10( 64-bit), Intel/AMD CPU; macOS 11.0, Intel/Apple CPU |
| Compatible software | Zoom, OBS, Teams, and more (for PC/ Mac) |
| Other features | DSLR Style Control, Advanced Light Correction |
| Dimensions and weight | 5.8 x 8 x 4.8 cm; 103 grams |
| Included components | Mounting hardware, face cam, mount with 1/4″ thread, privacy cap, detachable USB-C cable, and quick start guide |
Pros:
- Outstanding image quality
- Large housing offers protection.
- Quick and easy setup
Cons:
- Flickering issues
- Expensive
Concluding Note:
You can consider any of these webcams for professional uses and projects involving complicated audio recording. They ensure high-quality audio, video, and image output. Besides, they are compatible with the latest operating systems and leading video conferencing software.
? Which Sensors support it?")


 sCMOS is technology dependent on the next-generation CMOS Image Sensor (CIS) design and fabrication techniques. The sCMOS image sensors provide fast frame rates, low noise, broad dynamic range, high resolution, high quantum efficiency, and a giant field of view concurrently in one image.
 Notwithstanding the developments of sCMOS 3.0 in 2018, which featured a readout noise of 0.7 electrons RMS, still more work needs to be done. Hamamatsu has released the ORCA-Quest, the primary scientific camera in its line-up to implement the latest qCMOS image sensor technology.