Just the way you would be using the flash boosters for enhancing the
flash range of your built-in camera flash, you would also need to soften the light and make it look natural. If you are a professional photographer, one of the most important aspects you need to check out would be a
DSLR Pop-Up Flash Diffuser. Let us check out the best flash diffusers you can go in today’s post.
What is DSLR Flash Diffuser?
You want the natural look in your photos. Given the fact that photography is all about using the light in a useful and practical manner, the natural look of your photos will only be evident if you can make the light look real.
Flash Diffusers are what would be helpful in this context. They tend to provide you with a natural lighting performance. The flash diffusers, not only, bring the natural look – but also ensures that the harsh tone from the light is removed. They diffuse the light that falls directly on the objects and spreads it from to form a softer light.
Best DSLR Pop Up Flash Diffusers in 2019
Well, the pop-up flash diffusers are an excellent option, but how to choose the best among them? There are hundreds of models available and to find the one that exactly meets your requirements may not be that easy.
We thought about helping you out and reviewed a few of them. The result? Here are our top picks for the best in terms of the best pop Up Flash Diffusers you can check out in 2019.
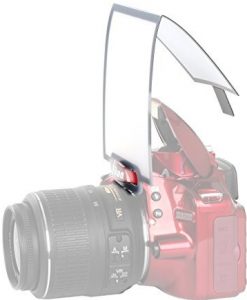
1. Sto-Fen Omni-Bounce OM-ET Flash Diffuser
Check on Amazon
The Sto-Fen Omni-Bounce OM-ET Flash Diffuser should be your prime choice for a flash diffuser if you are a professional photographer. It fits most of the flash units easily and naturally. It can deflect the light in all possible directions and even use walls and ceilings for bouncing the light.
The features that should make it a great choice including:
- It can be your best bet for macro and full, wide-angle photography.
- Custom fit for most of the camera flash guns and offers you a high degree of portability.
- It can work correctly to reduce red-eye, reflections, and shadows.
- The diffuser offers you a high degree of image quality.
The Pros
- It creates a soft neutral light
- Quite light and easy to handle.
The Cons
- Maybe a little difficult to take off once fitted.
If those features impress you, it may be a good idea to check it out on
Amazon.
2. Meyin MB-20 DSLR Flash Diffuser
Check on Amazon
Completely lightweight, portable and compatible with most of the cameras, the Meyin MB-20 DSLR Flash Diffuser is one of the excellent options to diffuse the light effectively. The diffuser is designed for Canon, Nikon,
Pentax, and Kodak DSLR SLR Camera. However, we expect it to suit a few other options as well.
A few salient features we loved with the flash diffuser include
- You have the options of white, blue and orange diffusers to choose from. The white diffuser will help you get the warm and cooler soft light, while the orange and blue diffusers will aid in getting specific light conditions.
- The diffuser is compatible with most of the cameras
- The open type design provides you a faster and smoother performance in terms of installing it.
- High-end portability
The Pros
- The diffuser should be an excellent option for an enhanced portability thanks to the fact that it can be collapsed.
- Ease of use and compact design
The Cons
- The only complaint we have come across is it pushes the flash a little down.
You may check it out at
this link on Amazon
3. Movo Photo SB3 Universal On-Camera Pop-Up Flash Diffuser
Check on Amazon
If you are looking for an affordable option for the flash diffuser requirements you may have, the Movo Photo SB3 Universal On-Camera Pop-Up Flash Diffuser should be a formidable choice for most of your needs. The flash diffuser is compatible with most of the DSLR and mirrorless cameras.
What makes it an able option in this list of best pop up flash diffusers? The following reasons may be practically enough –
- The flash diffuser comes with complete compatibility with almost all popular cameras and DSLRs.
- It should be your best bet against the issues like red-eye reduction.
- Does everything that it promises to and removes the harsh bright light from your shots.
The Pros
- The most affordable option for diffusing the bright and harsh light from your shots
- Quite easy to install on your DSLR camera.
- You can even customize it by adding more layers.
The Cons
- Some users reported that the fit is rather weak and the diffuser falls off
- It takes a little time to adjust the exposure right.
Want to give it a try? Why not try it out
here on Amazon?
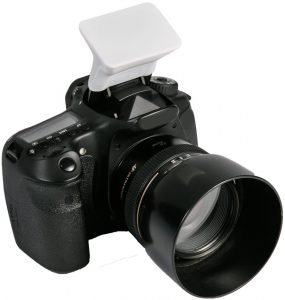
4. The NEST MiNi Pop-up Flash Diffuser
Check on Amazon
The NEST MiNi Pop-up Flash Diffuser is meant to be used with your pop up flash and provide you an efficient performance in terms of softening harsh light. It can also help you reduce the red-eye effects and unnecessary shadows.
A few great features that this affordable diffuser offers you can be summed up as
- The slip-on attachment option makes it a more accessible alternative by every means
- The pop-up flash diffuser weighs just under 10 grams and offers you a high performance
- The flexible TPU material should make it one of the best options for a perfect diffusion of light.
The Pros
- Universal compatibility with most of the DSLR cameras makes it a great choice to go with.
- The easy to install option makes it an excellent choice for easy implementation.
The Cons
- A few users consider that the material is a little thicker.
If those features impress you enough, you can have a look at the product
here on Amazon.
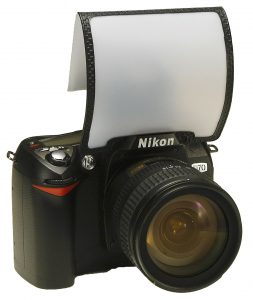
5. LumiQuest SoftScreen SLR Flash Diffuser
Check on Amazon
The LumiQuest SoftScreen SLR Flash Diffuser is one of the prominent choices for the pop-up flash diffusers. It may be one of the expensive options to reduce the glare from your camera flash, but offer you the best build quality and long-lasting performance.
Some of the excellent features that you will find with the product can be summarised as
- It can even reduce the harshest of the light emitted from the DSLR pop up flashes.
- It can install itself directly on the horseshoe
- It can work with a wide range of digital cameras and 35mm SLRs
- The product is available in multiple color options of Neon Blue, Neon Green, and Neon Pink.
The Pros
- This can be one of the excellent options to work with your low light shots.
- It fits almost all the cameras with ease.
- It can fold flat and thus does not exert pressure on the flash
The Cons
- Working with the Sony cameras will need a little trimming
You can check out the option on Amazon at
this link.
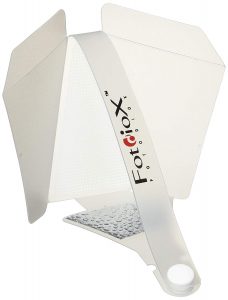
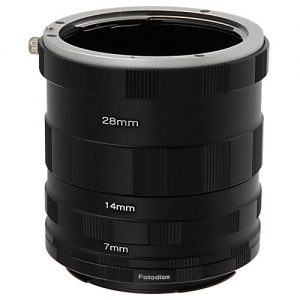
6. Fotodiox Pop-Diff-Nik Fotodiox Pop-UP Flash Diffuser
Check on Amazon
The Fotodiox Pop-Diff-Nik Fotodiox Pop-UP Flash Diffuser should work with most of the DSLR cameras with ease. The diffuser is user-friendly and quite affordable for most of your requirements.
Some of the features worth noticing can be summed up as
- The product is specifically designed for the pop-up flash diffusing needs.
- The flash diffuser comes with premium grade diffusing functionality and harsh light minimizer
- Collapsible design for ease of use.
- Two years warranty
The Pros
- An excellent affordable option for your needs in harsh light diffuser requirements
- The easy installation on most of the cameras should be one of the features you will find interesting enough.
The Cons
- Some DSLR models have installation issue as the diffuser does not mount properly.
- The fold at the back pokes your nose or face when trying to take pictures.
If you think of checking out the diffuser, you may get more information at
this link on Amazon.
To Summarize
Those were the top six tried and tested pop up flash diffuser options you can check out. Having to arrange all those external flashes and the diffusers therein can take a huge lot of time and effort in effectively shooting your images. Moreover, it robs you of the spontaneous nature of your photography, especially it comes up in an unplanned manner.
Have you used any of the flash diffuser options we have outlined herein above? If you have used any of them, do share your thoughts and experiences with those options.
If you are a professional photographer, you will need a massive list of accessories for getting the most from your professional level cameras and your shooting schedules. One of the standard accessories you would want to check out is
Pop Up Flash Booster. Let us check out the best Pop Up Flash Boosters we can lay our hands on. Our choice may be limited as there are not many options available at our disposal.
What is Pop Up Flash Booster?
The name itself should indicate the purpose of the accessory that we will be discussing. The flash booster is used to boost the intensity of your flash. It will enhance the performance of your booster further.
The Pop Up Flash Booster will serve as a useful option if you are looking to go for an increased range of flash and the number of stops. Needless to say, flash boosters are one of the most necessary accessories if you are into flash photography. Since the pop-up flash boosters are easy to carry and use, they should not pose any issues if you plan to use them.
Given the fact that the inbuilt camera flash is not capable of good ranges, you need to invest in an external flash. These external flashes tend to be quite expensive, and if you are new to photography, you may not be willing to spend in an external flash as such. Moreover, they add up bulk and weight to your shooting paraphernalia. Pop Up Flash Boosters can come quite handy in those situations and help you enhance the flash range of your built-in flash and improve the performance further.
Best DSLR Pop Up Flash Boosters in 2019
Having understood the role that a flash booster plays in your flash photography and how inexpensive it can be, let us move ahead checking out the best pop up flash boosters you can opt for.
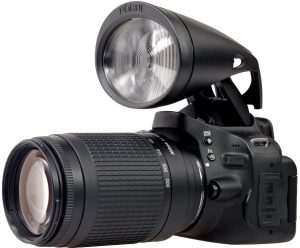
1. Rogue Safari DSLR Pop-Up Flash Booster
Check on Amazon
This is one of the prominent choices when it comes to the pop-up flash boosters. Rogue has been involved in the technology and concept since long and a mighty name to reckon with.
What feature does it come with? Here are the options that you stand to get with it –
- You can use the booster to enhance the flash range for your Nikon and Canon DSLR cameras.
- It has optically engineered Fresnel lens for improving the flash range of your DSLR camera pop up flash.
- It can be one of the excellent options to use with the all in one telephoto lenses.
- Weighing just 60 grams, it offers you a compact and lightweight functionality.
- It is compatible with most of the Canon APS-C, and all Nikon DX sensor DSLR cameras.
The Pros
- It attaches securely to the camera horseshoe
- Extremely lightweight and offers excellent portability.
- An affordable option for the newbies in photography.
The Cons
- The plastic lens and casing looks a little cheap
- It is not suitable for Sony Cameras.
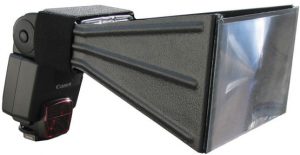
2. The Flash X-Tender Better Beamer FX
Check on Amazon
Coming from the house of better Beamer, the Flash X-Tender is a good flash booster you can go with. It can be used as the best option for the Nikon B 900 flash.
Some of the features you will find interesting enough on the accessory can be summarised as
- It enhances the flash output of your built-in camera flash.
- Faster recycle times will make it an excellent choice for those situations where you need continuous shooting or moving objects
- The exposure handling automatically by TTL makes it a great choice.
- It offers you an enhanced battery backup
The Pros
- It helps you shoot easily to overpower the sun
- It would double up as an excellent option for shooting wildlife from a distance.
The Cons
- It can cause red-eye effect if you are using it to shoot birds.
- You need to adjust the angle rather frequently.
3. The Flash X-Tender (Better Beamer) FX-5 Flash Output Booster
Check on Amazon
This is yet another option coming from the Better Beamer and designed for the Canon 430-EX. It can help you extend the flash range to a considerable extent.
A few features that would be helpful include
- It helps you focus your flash to a better level through the use of a big telephoto lens.
- You stand to get a better and faster flash to recycle times.
- An enhanced battery backup will help you save battery.
The Pros
- It just weighs under 3 ounces and offers excellent performance for your portability
- One of the best option if you are shooting moving objects thanks to faster flash recycle times.
The Cons
- The attachment option to your camera is a little out of place.
Which One should you go with?
As we said, there are not many options available for a pop-up flash booster for your DSLR cameras. From that perspective, we have listed the top three options we could lay our hands on.
Rogue is one of the prominent brands that is involved in the pop-up flash boosters. Apart from the Nikon and Canon DSLR cameras, it should be one of the best options for a host of other camera brands as well. It should be one of the prominent options for all your requirements if you want to get the telephoto compatibility for your entry-level cameras.
The Concluding Thoughts
That was our top picks for the best options you can try out for the pop-up flash boosters or flash extenders. Photographers tend to use the external flash for the enhanced flash for filling in the light where needed. However, if you are new to the photography world and an external flash is out of binding for you – at least as of now, flash boosters and flash extenders are precisely what you will find to be an excellent option.
Have you used any of the flash booster options for your photography requirements? If you have found the boosters featured one of the best options, you can share your thoughts with us. You may also share any other useful information with us.


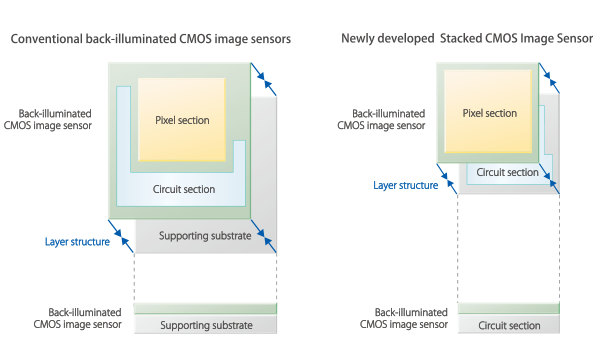 The above image should provide an insight into the technology and how it works. Let us now check out the two capable sensors and the features that it offers you.
Sony has introduced three different sensors among the Sony Exmor sensors –
The above image should provide an insight into the technology and how it works. Let us now check out the two capable sensors and the features that it offers you.
Sony has introduced three different sensors among the Sony Exmor sensors –


 Using a


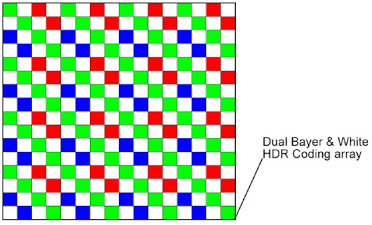 The sensor makes use of the white pixels in addition to the existing array of RGB pixels. The cameras using the sensor will capture more light through the white pixels. This will help you get better details and more brightness in your videos and images. Thus you will find a better performance in terms of low light photography.
The sensor uses Quad Pixel Phase Detection Auto Focus referred to as QPDAF for a faster and better autofocus function. The specifications also state that the new sensor will feature high-SNR pixel binning readout function, advanced noise reduction, dual sensor synchronization operation, and built-in ambient light and temperature sensors.
The service is expected to launch with the high-end flagship devices being launched in 2019. The most likely devices to include the new sensor include Google Pixel 4 or Google Pixel 4 XL. However, there is no official confirmation available for the availability of the sensors on the Google’s smartphones as yet. However, the new sensor is likely to be introduced with the Huawei Mate devices. We would expect the sensor to be launched with Huawei P30 Mate in 2019.
The sensor makes use of the white pixels in addition to the existing array of RGB pixels. The cameras using the sensor will capture more light through the white pixels. This will help you get better details and more brightness in your videos and images. Thus you will find a better performance in terms of low light photography.
The sensor uses Quad Pixel Phase Detection Auto Focus referred to as QPDAF for a faster and better autofocus function. The specifications also state that the new sensor will feature high-SNR pixel binning readout function, advanced noise reduction, dual sensor synchronization operation, and built-in ambient light and temperature sensors.
The service is expected to launch with the high-end flagship devices being launched in 2019. The most likely devices to include the new sensor include Google Pixel 4 or Google Pixel 4 XL. However, there is no official confirmation available for the availability of the sensors on the Google’s smartphones as yet. However, the new sensor is likely to be introduced with the Huawei Mate devices. We would expect the sensor to be launched with Huawei P30 Mate in 2019.