A deep dive into Samsung's latest mobile image sensor technologies.
Introduction to Samsung ISOCELL Mobile Image Sensors
Samsung Electronics holds a significant position in the global complementary metal-oxide semiconductor (CMOS) image sensor market, actively competing with leading manufacturers such as Sony. The ISOCELL brand, initially introduced by Samsung in September 2013, signifies the company's commitment to advanced pixel technology aimed at enhancing light sensitivity and color fidelity in mobile imaging devices.
The objective of this report is to meticulously examine the technical specifications, performance capabilities, and strategic market positioning of the ISOCELL JN5, ISOCELL GN5, and ISOCELL KD1 sensors. By conducting a detailed comparison of their core features, advanced technological implementations, and intended applications, this analysis aims to offer clear, actionable insights for product development, competitive assessment, and strategic planning within the dynamic mobile imaging sector. The information presented herein is derived from official Samsung Semiconductor product pages, supplemented by relevant industry reports and product reviews, to provide a holistic understanding of each sensor's capabilities and its real-world implications.
ISOCELL Sensor Profiles: JN5, GN5, and KD1
ISOCELL JN5: The Compact 50MP Innovator
The ISOCELL JN5 is a 50MP image sensor engineered for adaptability and high-quality imaging across various camera positions within a smartphone. Its unveiling in June 2024 signifies Samsung's renewed strategic focus on the premium mobile sensor segment.
Key Specifications:
- Effective Resolution: 8,192 x 6,144 (50MP)
- Pixel Size: 0.64 μm
- Optical Format: 1/2.76"
- Color Filter: Tetrapixel RGB Bayer Pattern
- Autofocus: Super QPD (PDAF)
- HDR Technologies: Staggered HDR, Dual Slope Gain (DSG)
- Video Frame Rate: 60 fps at 4K resolution, 240 fps at FHD resolution
- Low-Light Enhancements: Incorporates Dual Vertical Transfer Gate (D-VTG) technology to significantly reduce noise in extremely dark conditions. It also utilizes Tetrapixel technology for pixel binning, which enhances light absorption.
- Special Features: The JN5 supports hardware remosaic-based 2x In-Sensor Zoom, enabling 2x zoom on wide-angle cameras and up to 6x zoom on telephoto cameras when paired with 3x modules, thereby delivering clearer image quality. It also includes a low-power Always-On mode for functionalities such as motion recognition on the front camera. Its design allows for consistent camera performance whether used as a front, wide, ultra-wide, or telephoto camera.
The JN5's compact 0.64μm pixel size, coupled with its 50MP resolution and 1/2.76" optical format, represents a deliberate design choice. This smaller physical footprint is critically important for contemporary smartphones that often feature multiple camera modules and increasingly slim profiles. This design allows the JN5 to be highly adaptable, enabling its deployment across various camera positions—front, wide, ultra-wide, or telephoto—within a single device. Such versatility simplifies supply chain management for original equipment manufacturers (OEMs) and potentially reduces manufacturing costs while maintaining high image quality across diverse applications. The inherent challenge of smaller pixels in low-light environments, which typically leads to increased noise, is directly addressed by the integration of Dual Vertical Transfer Gate (D-VTG) technology, underscoring Samsung's engineering efforts to mitigate physical limitations through advanced pixel architecture.
ISOCELL GN5: The Flagship 50MP Performer
The ISOCELL GN5, a 50MP sensor launched in September 2021, is positioned as a high-performance solution, particularly optimized for main camera applications, with a strong emphasis on rapid autofocus and enhanced low-light capabilities.
Key Specifications:
- Effective Resolution: 8,160 x 6,144 (50MP)
- Pixel Size: 1.0 μm
- Optical Format: 1/1.57"
- Color Filter: Dual Tetrapixel RGB Bayer Pattern
- Autofocus: Features Dual Pixel Pro (PDAF) technology, which enhances autofocus speed and accuracy in all lighting conditions by splitting pixels both horizontally and vertically to recognize pattern changes in all directions.
- HDR Technologies: Supports Staggered HDR and Smart-ISO Pro (iDCG). Smart-ISO Pro is particularly notable as it creates two simultaneous readouts (one at High ISO and one at Low ISO) when the shutter activates, which are then merged to produce a final HDR image with 12-bit color depth and reduced motion artifacts.
- Video Frame Rate: Capable of 30 fps at 8K resolution, 120 fps at UHD (4K) resolution, and 240 fps at FHD resolution (with autofocus).
- Low-Light Enhancements: Leverages Tetrapixel technology, which combines four neighboring pixels into one large 2.0μm pixel to produce brighter 12.5MP images with less noise. It also incorporates Smart-ISO and Multisampling techniques for noise reduction. The GN5 is distinguished as the first Dual Pixel product in the industry to utilize Front Deep Trench Isolation (FDTI) design, which enhances the full well capacity for each photodiode and minimizes crosstalk.
The GN5's larger 1.0μm pixel size, when compared to the JN5's 0.64μm, despite both being 50MP sensors, indicates a different design philosophy. Larger pixels are inherently more capable of capturing light, which directly translates to superior low-light performance and an improved dynamic range. This design choice typically necessitates a larger optical format (1/1.57" for GN5 versus 1/2.76" for JN5), making the GN5 more suitable for a primary camera module where space constraints are generally less restrictive and overall image quality is of paramount importance. The integration of Front Deep Trench Isolation (FDTI) further augments light collection efficiency and minimizes signal interference between pixels, reinforcing its role as a high-performance main sensor. This demonstrates Samsung's strategy of offering distinct 50MP solutions, each meticulously tailored for different camera roles and performance priorities within the mobile imaging ecosystem.
ISOCELL KD1: The Compact 32MP Solution
The ISOCELL KD1 is a 32MP mobile image sensor distinguished by its compact pixel size, rendering it highly suitable for applications where physical space is at a premium, such as front-facing cameras.
Key Specifications:
- Effective Resolution: 6,560 x 4,928 (32MP)
- Pixel Size: 0.64 μm
- Optical Format: 1/3.42"
- Color Filter: Tetrapixel RGB Bayer Pattern
- Autofocus: Features Double Super PD (PDAF)
- HDR Technologies: Utilizes Smart-ISO (Inter-scene DCG) and Staggered HDR.
- Video Frame Rate: Official Samsung documentation indicates: 60 fps at 8MP resolution. However, multiple external industry reviews and product specifications consistently report the ISOCELL KD1 supporting 4K at 60fps.
- Low-Light Enhancements: Employs Tetrapixel technology for pixel binning, which enables the capture of brighter images in dimly lit conditions. It also incorporates Smart-ISO for optimal ISO selection based on ambient light.
A notable observation regarding the KD1 pertains to the discrepancy in its video capabilities between Samsung's official product page information and external industry sources. While Samsung's official site primarily lists "60 fps @8MP," real-world implementations in smartphones clearly demonstrate support for 4K at 60fps. This difference suggests that public-facing product pages may sometimes offer simplified or generalized specifications, potentially to avoid overwhelming a general audience or to allow for OEM-specific optimizations that unlock the sensor's full potential. For an industry analyst, this highlights the critical need to cross-reference official documentation with real-world performance and OEM implementations to gain a complete understanding of a component's capabilities and its true market relevance. The KD1's 0.64μm pixel size and 1/3.42" optical format emphasize its compact design, making it an ideal choice for space-constrained applications like front-facing cameras, where 4K video is an increasingly desired feature for enhanced user experience.
Comparative Analysis: Performance and Technology Deep Dive
This section provides a direct comparison of the ISOCELL JN5, GN5, and KD1 sensors across key performance metrics and technological implementations, highlighting their differentiators and their implications for mobile imaging.
Resolution and Pixel Architecture
Both the ISOCELL JN5 and GN5 are 50MP sensors, while the ISOCELL KD1 offers a 32MP resolution. A key architectural distinction lies in their pixel sizes: the JN5 and KD1 share a compact 0.64μm pixel, whereas the GN5 features a larger 1.0μm pixel. All three sensors universally employ Tetrapixel technology for pixel binning. This technology effectively merges data from four adjacent pixels to simulate a larger pixel, significantly enhancing light absorption and reducing noise, particularly in low-light conditions. This process typically results in a binned output of 12.5MP for the 50MP sensors (JN5, GN5) and 8MP for the 32MP KD1.
Beyond pixel size, each sensor incorporates unique underlying pixel technologies to optimize performance. The JN5 features Dual Vertical Transfer Gate (D-VTG) technology, which plays a crucial role in dramatically improving noise performance in extremely dark environments, a vital capability given its ultra-small pixel size. The GN5 stands out as the first Dual Pixel product to integrate Front Deep Trench Isolation (FDTI) design, a innovation that enhances the full well capacity for each photodiode and minimizes signal crosstalk, thereby improving image clarity. The KD1, for its part, leverages ISOCELL Plus technology, which optimizes color fidelity and light sensitivity by employing advanced pixel isolation techniques.
The difference in pixel size between the 50MP JN5 (0.64μm) and GN5 (1.0μm) represents a fundamental design trade-off that dictates their primary applications. The JN5's smaller pixels enable a significantly more compact optical format (1/2.76" compared to the GN5's 1/1.57"). This compact size is instrumental in allowing the JN5 to be "mounted anywhere" and "perform everywhere", making it highly versatile for integration into multi-camera setups where module thickness and overall device slimness are critical design constraints. Conversely, the GN5, with its larger pixels, prioritizes raw light gathering capability. This emphasis on light capture directly translates to superior image quality, especially in challenging lighting conditions, positioning it as a prime candidate for a flagship main camera where uncompromising performance is expected. The KD1, also featuring 0.64μm pixels, further underscores the trend of miniaturization for specialized roles, such as front cameras, where a minimal footprint is essential for achieving modern full-screen display designs. These distinct design choices illustrate Samsung's strategic approach to offering optimized sensors that balance resolution, physical dimensions, and light performance for various roles within a smartphone's camera array.
Autofocus Capabilities
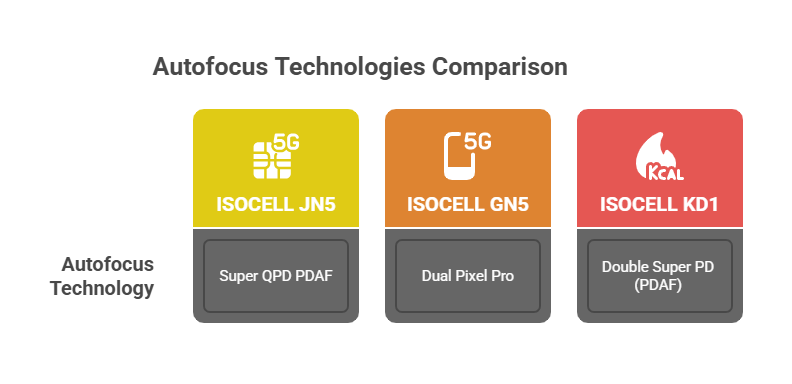
Autofocus performance is a critical differentiator in mobile imaging, and all three sensors incorporate advanced Phase Detection Autofocus (PDAF) technologies. The ISOCELL JN5 utilizes Super QPD (Quad Phase Detection) PDAF. The ISOCELL GN5 features Dual Pixel Pro technology, which is designed to split pixels both horizontally and vertically. This enables the sensor to recognize pattern changes in all directions, leading to faster and more accurate autofocus performance across a wide range of lighting conditions. The ISOCELL KD1 employs Double Super PD (PDAF).
The consistent adoption of advanced PDAF variants across these sensors underscores the paramount importance of rapid and precise focusing in contemporary mobile photography. Dual Pixel Pro, as implemented in the GN5, represents a significant advancement by enabling multi-directional focusing. Super QPD in the JN5 is likely an evolution of this technology, potentially offering even more robust and accelerated quad-phase detection. For the KD1, Double Super PD implies a doubling of autofocus pixels compared to a standard Super PD system. This enhancement leads to increased speed and accuracy in focusing, which is particularly vital for capturing fleeting moments and for selfie cameras where user movement might be less controlled. This continuous innovation in PDAF technology demonstrates Samsung's unwavering commitment to ensuring users can capture sharp, blur-free images with confidence, a key competitive battleground in the smartphone market.
High Dynamic Range (HDR) Solutions
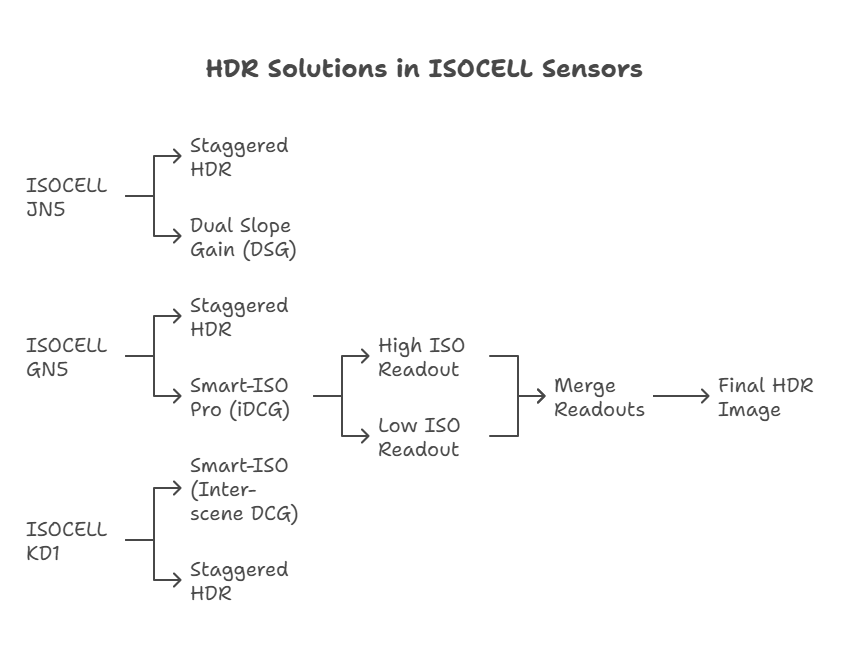
Each sensor incorporates distinct High Dynamic Range (HDR) solutions to optimize image quality across varying lighting conditions. The ISOCELL JN5 supports Staggered HDR and Dual Slope Gain (DSG) technologies. The ISOCELL GN5 features both Staggered HDR and Smart-ISO Pro (iDCG). The Staggered HDR in the GN5 captures a scene using three different exposures, which are then merged to achieve a dynamic range of up to 100dB. Smart-ISO Pro is a particularly advanced feature that creates two simultaneous readouts (one at High ISO and one at Low ISO) when the shutter fires. These two readouts are then merged to produce a final HDR image with 12-bit color depth and reduced motion artifacts. The ISOCELL KD1 employs Smart-ISO (Inter-scene DCG) and Staggered HDR.
The diverse array of HDR technologies implemented across these sensors highlights Samsung's multi-faceted approach to dynamic range optimization. Staggered HDR is a widely adopted and effective method for combining multiple exposures to enhance detail in both bright and dark areas of a scene. Smart-ISO, common to GN5 and KD1, dynamically adjusts gain settings based on ambient lighting conditions to achieve optimal exposure. The GN5's Smart-ISO Pro stands out due to its ability to simultaneously capture high and low ISO readouts. This simultaneous capture is a crucial advancement because it directly addresses and mitigates the motion artifacts that can often appear in traditional multi-exposure HDR systems when subjects are moving. This results in cleaner, more natural-looking images for dynamic scenes and allows for a higher 12-bit color depth. The JN5's Dual Slope Gain offers an alternative method for expanding dynamic range within a single exposure. This strategic tailoring of specific HDR implementations to the performance tiers and target use cases of each sensor demonstrates Samsung's dedication to delivering "lifelike colors and depth" and capturing "stunning details in both bright and dark areas of the frame".
Video Recording Performance
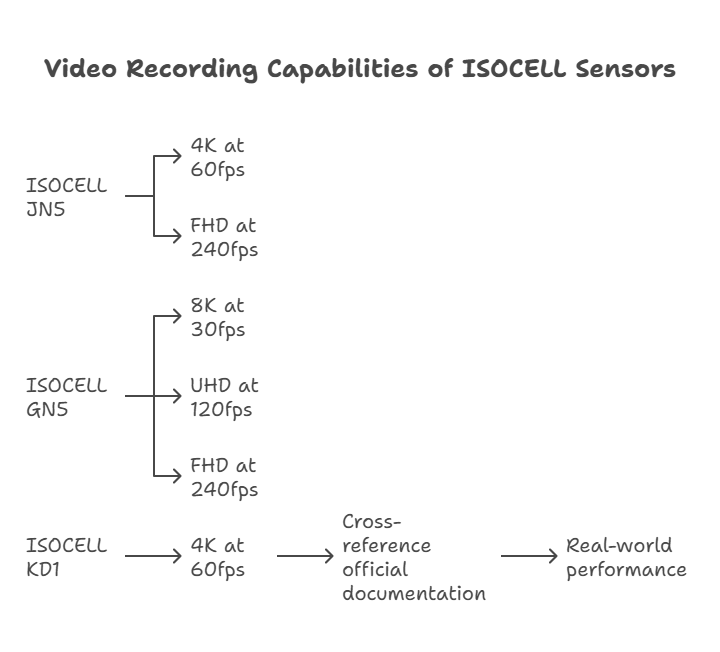
The video recording capabilities of these sensors reflect the growing demand for high-quality mobile video capture. The ISOCELL JN5 is capable of recording video at 60 frames per second (fps) in 4K resolution and 240 fps in FHD resolution. The ISOCELL GN5 offers robust video performance, supporting 30 fps at 8K resolution, 120 fps at UHD (4K) resolution, and 240 fps at FHD resolution (with autofocus).
For the ISOCELL KD1, a notable difference exists between official specifications and real-world application. While Samsung's official documentation lists video capabilities at 60 fps for 8MP resolution, external sources, including smartphone reviews, consistently report the ISOCELL KD1 supporting 4K at 60fps, particularly when integrated as a front-facing camera. This disparity highlights a common characteristic in the semiconductor industry where official documentation may provide a baseline or simplified set of specifications, while the full, optimized capabilities of a sensor can be unlocked through specific integration and advanced processing within a final smartphone system. For an industry analyst, this highlights the critical need to cross-reference official documentation with real-world performance and OEM implementations to gain a complete understanding of a component's capabilities and its true market relevance. This also indicates that 4K at 60fps is rapidly becoming a standard expectation even for compact, secondary camera sensors.
Low-Light Imaging Excellence

Low-light performance remains a significant challenge in mobile photography due to inherent limitations in sensor and pixel size. All three sensors employ strategies to address this. The ISOCELL JN5, despite its notably small 0.64μm pixel size, utilizes Dual Vertical Transfer Gate (D-VTG) technology to significantly improve noise reduction in extremely dark conditions. It also incorporates Tetrapixel technology for pixel binning, which boosts light absorption. The ISOCELL GN5 leverages Tetrapixel and Smart-ISO technology to produce crisp and clear images in low-light environments. Smart-ISO automatically selects a High ISO mode in dim conditions to convert light into a digital signal at a higher ratio, and multisampling techniques further enhance noise reduction by averaging multiple frames. The ISOCELL KD1 also employs Tetrapixel and Smart-ISO technology to enhance color and detail in low light, intelligently switching to a high ISO mode to reveal details in shadows.
The reliance on pixel binning (Tetrapixel) and Smart-ISO technologies across all three sensors highlights their foundational role in mitigating low-light challenges. However, the JN5's D-VTG technology is particularly noteworthy as it directly tackles the intrinsic noise associated with its ultra-small 0.64μm pixels, allowing them to perform effectively even in very dark environments. Similarly, the GN5's Front Deep Trench Isolation (FDTI) technology contributes to low-light performance by minimizing crosstalk between pixels, which is crucial for maintaining image clarity and color accuracy in challenging lighting. These advanced pixel engineering efforts, alongside broader ISOCELL advancements like ISOCELL Plus and ISOCELL 2.0, demonstrate Samsung's continuous investment in pushing the boundaries of light sensitivity and noise reduction. The emphasis on these specialized technologies underscores their importance in differentiating mobile image sensors in a highly competitive market, where superior low-light imaging is a key consumer demand.
Unique Features and Design Considerations
Each sensor incorporates unique features and design philosophies tailored to specific applications and evolving smartphone trends.
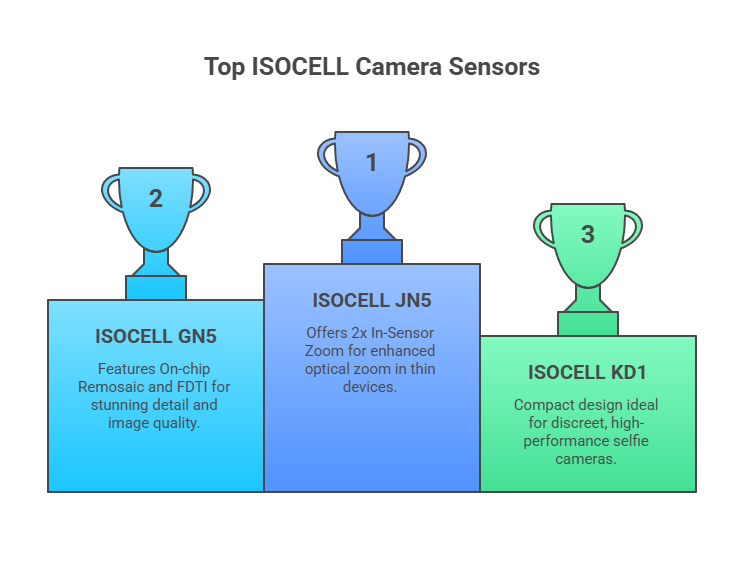
The ISOCELL JN5 is distinguished by its 2x In-Sensor Zoom, a hardware remosaic-based feature that provides 2x zoom on wide-angle cameras and up to 6x zoom on telephoto cameras when combined with 3x modules, resulting in clearer image quality. This capability directly addresses the consumer desire for enhanced optical zoom in increasingly thin devices, potentially reducing the reliance on bulky optical zoom modules. Furthermore, the JN5 supports a low-power Always-On mode for features such as motion recognition on the front camera. This functionality suggests integration with advanced, AI-driven features that enhance user interaction and device intelligence. Its inherent versatility allows for a consistent camera experience across front, wide, ultra-wide, or telephoto applications.
The ISOCELL GN5 incorporates On-chip Remosaic technology, where each of its 50 million pixels contains two photodiodes, enabling the capture of images with stunning detail. A pioneering feature of the GN5 is its use of Front Deep Trench Isolation (FDTI), making it the industry's first Dual Pixel product to do so. This design improves full well capacity and minimizes crosstalk, contributing to overall image quality.
The ISOCELL KD1 is characterized by its compact design, which makes it slim and amenable to supporting smaller and less distracting camera holes. This design frees up valuable screen real estate on full-screen displays. This compactness positions the KD1 as an ideal solution for selfie cameras, where a discreet and high-performance sensor is highly valued.
These unique features and design considerations reflect Samsung's responsiveness to evolving smartphone design imperatives and user demands. The JN5's "In-Sensor Zoom" directly responds to the market's pursuit of enhanced optical capabilities within thinner device profiles. Its "Always-On mode" points towards deeper integration with AI-powered features, improving user experience through intelligent sensing. The KD1's compact design is a clear adaptation to the prevalence of full-screen displays and the desire for minimal camera intrusions. These specialized functionalities demonstrate Samsung's capacity for innovation beyond core image quality, providing value-added capabilities that align with broader smartphone industry trends and design priorities.
Market Positioning and Strategic Implications
The ISOCELL JN5, GN5, and KD1 sensors are strategically positioned within Samsung's mobile imaging portfolio to address diverse market needs and competitive landscapes.
The ISOCELL JN5 is positioned as a versatile, premium 50MP sensor suitable for various camera modules—including main, wide, ultra-wide, telephoto, and front cameras—in high-end to mid-range smartphones. It particularly appeals to manufacturers prioritizing thinness and multi-camera functionality. Its recent unveiling in June 2024 places it at the forefront of Samsung's current offerings, signaling a renewed push into the premium mobile sensor market.
The ISOCELL GN5 is a flagship 50MP sensor primarily targeting high-end main camera applications. Its larger pixels, advanced autofocus (Dual Pixel Pro), and 8K video capabilities provide a premium imaging experience. Launched in 2021, it has served as a staple in flagship devices, demonstrating Samsung's capacity for high-performance primary sensors.
The ISOCELL KD1 is a compact 32MP sensor ideally suited for space-constrained applications, most notably front-facing (selfie) cameras across a broad spectrum of smartphones. Its 0.64μm pixel size and compact optical format make it an excellent fit for modern full-screen display designs, where minimal camera cutouts are desired.
Samsung's diverse ISOCELL portfolio, which also includes sensors like the HP9, GNJ, and JNP, enables the company to compete effectively across various price points and performance tiers. The JN5 and GN5, both 50MP sensors, exemplify different engineering philosophies: the JN5 is optimized for space-constrained versatility through smaller pixels and D-VTG technology, while the GN5 focuses on uncompromised main camera performance with larger pixels and FDTI. This tailored approach allows Samsung to provide specific solutions to OEMs based on their unique design and performance objectives. The KD1, in turn, fills a crucial niche for compact, high-resolution secondary cameras, particularly important for the increasingly significant front-facing camera segment.
In the broader industry context, Samsung is actively challenging Sony's long-standing dominance in the image sensor market. The launch of the JN5 in June 2024 signifies Samsung's intensified efforts to re-enter and expand its presence in the "premium mobile sensor space" following a period of development focus. The strategic decision to supply sensors to major rivals like Xiaomi and to target North American technology firms underscores Samsung's willingness to compete aggressively on sensor technology, even with companies that are direct competitors to its own mobile division. The emphasis on fundamental pixel architecture improvements, such as the development of nanoprism technology, suggests a focus on achieving "clearer photos under challenging lighting" without increasing sensor size—a critical challenge for the design of slim and foldable smartphones. This commitment to fundamental breakthroughs aims to provide a distinct competitive advantage. Furthermore, Samsung's ambition extends beyond smartphone applications into the automotive and robotics sectors, indicating a long-term vision for the expansion and diversification of its image sensor business.
Conclusion and Recommendations
The analysis of Samsung's ISOCELL JN5, ISOCELL GN5, and ISOCELL KD1 mobile image sensors reveals a sophisticated and diversified product strategy, each sensor meticulously engineered to excel in specific applications within the mobile imaging ecosystem.
The ISOCELL JN5 emerges as a highly versatile 50MP sensor, characterized by its compact footprint, advanced in-sensor zoom capabilities, and low-power features. It is ideally suited for multi-camera setups where space is a constraint, offering high performance across wide, ultra-wide, telephoto, or front camera roles.
The ISOCELL GN5 stands as a premium 50MP main camera sensor. Its larger pixels and advanced Front Deep Trench Isolation (FDTI) technology contribute to exceptional low-light performance, complemented by industry-leading Dual Pixel Pro autofocus and robust 8K video recording capabilities. This sensor is best suited for flagship smartphones that demand uncompromised primary camera quality.
The ISOCELL KD1 is a compact 32MP sensor, particularly strong for front-facing camera applications. Its small size facilitates discreet integration into full-screen designs, and its confirmed 4K at 60fps video capabilities (as evidenced by real-world implementations) make it a compelling choice for high-quality selfie experiences.
For original equipment manufacturers (OEMs) and product developers, these distinctions offer clear guidance for sensor selection:
- For OEMs prioritizing thin and versatile multi-camera systems, the ISOCELL JN5 presents a compelling balance of resolution, features, and compact design across various camera positions.
- For flagship main camera performance where superior low-light imaging and autofocus speed are paramount, the ISOCELL GN5 remains a top-tier choice.
- For advanced front-facing camera solutions that require high resolution, 4K video capabilities, and a minimal physical footprint, the ISOCELL KD1 is an excellent option, even with its officially understated specifications.
Furthermore, OEMs should consider Samsung's broader strategic push in the image sensor market, including its continuous innovation in fundamental pixel technology, such as nanoprism development. These ongoing advancements promise future performance gains and competitive differentiation, indicating Samsung's long-term commitment to leading in the mobile imaging space.


